Bess has been "run-in" and is performing admirably. With a garage full of other bikes to ride, I've not been able to ride Bess as much as she deserves. I did, however, run her down to the Strathmore Arms a couple of days ago. There and back at a steady 65-70 mph. Way to go!!
Wednesday, 24th May, 2023.
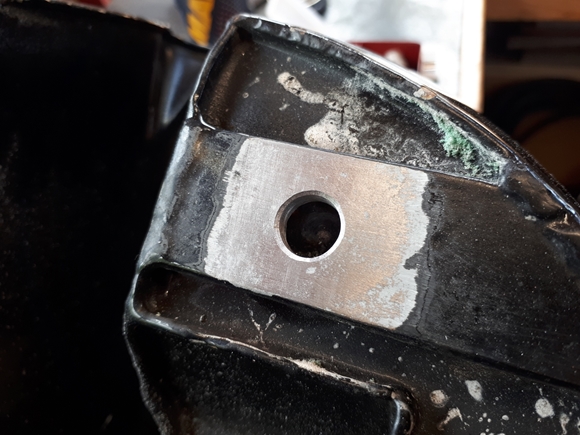
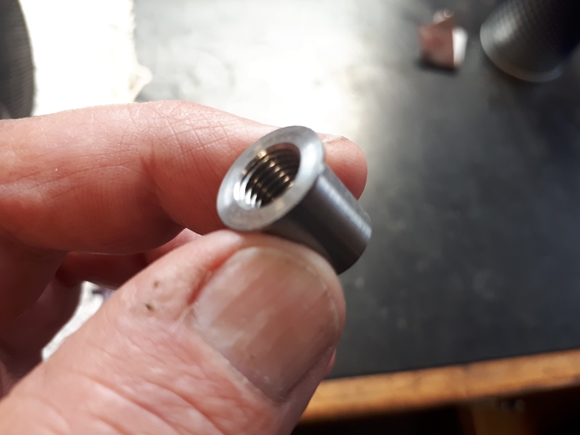
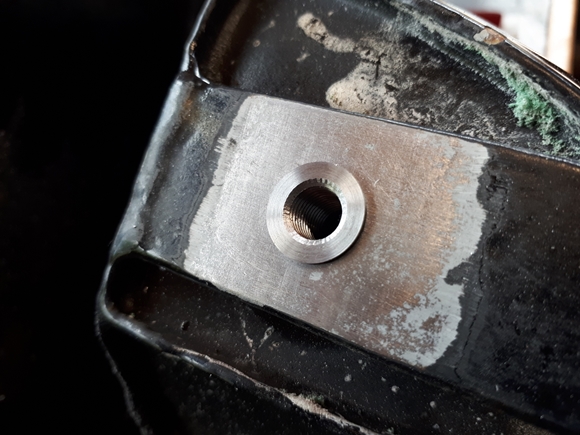
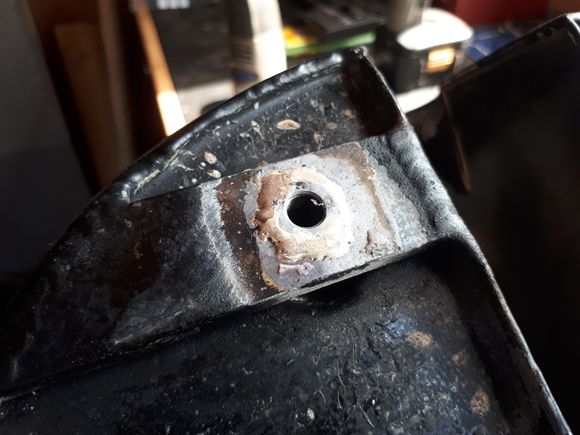
When I got back from the Strathmore Arms, I noticed that one of the petrol tank bolts had fallen out. It was still attached to the wire I'd used to stop it undoing. It turned out that the thread had stripped... as had two others, and the forth wasn't looking that good, either. It was not a very good fixing when it was new, over 70 years ago. The bolts are screwed into a tapped hole in a plate that is only 1/8" thick. It was time for a permanent solution. I drilled out the threaded holes to 7/16", and turned up four steel inserts to fit into the holes. These were drilled and tapped with the 5/16" BSCy thread to match the new bolts I'd ordered. The inserts were silver soldered into the original mounting plates. They had a full 1/2" of thread depth so there would be less chance of them being stripped again. OK... the silver soldering isn't that pretty, but I guarantee that the inserts won't drop out any day soon, and it didn't look that bad with a coat of black paint.
Thursday, 17th July, 2025.
 OK... lets move on 2 years. We're now half way through July and Bess is in the workshop again. To be truthful, I've not put many miles on her in the last couple of years but I have noticed an ever increasing amount of oil in the drip tray under the engine. The workbench was empty so Bess was brought in for a little investigative work. As it happens, it was pretty obvious that oil was gradually draining from the oil tank into the crankcase, commonly known as "wet sumping". It was also obvious that the crankcase was no longer oil tight as oil was dripping from the joint between the two crankcase halves.
So... I've taken the decision to lift the engine out of the frame and split the crankcase. I've had the engine out twice before but I've never completely stripped the crankcase down to it's component parts. That's what will happen now, as I need to clean and seal the joint between the two halves.
Today I made a start and the only problem I encountered was removing the crankshaft timing pinion. It needed considerable heat from the oxy/MAPP gas torch and a special home made removing tool to get the timing pinion off the crankshaft.
Friday, 18th July, 2025.
 When I repaired the threads in the petrol tank a while ago, I had the tank upside down on the bench. I'd laid out a cloth to protect the paint but a lump of steel swarf went un-noticed and I ended up with some deep scratches in the paint. As the tank is currently off the bike, I took the opportunity to drop it round to Kris at the Lutton Body Shop. He's going to work some of his wizadry on it, and I expect that it will come back in due course looking perfect.
The engine is out and has been dismantled. The bottom end looks to be in very good condition. The main bearings are good, as is the big end. I'll start cleaning and reassembling next week. The crankcase split easily. It had been joined with what looks like red Hermatite but it was obviously not doing it's job any longer. I'll probably put it together with ThreeBond.
Wednesday, 23rd July, 2025.
I have mentioned in the past my "displeasure" with one (or possibly all) of the previous owners. What I found today pretty much eclipses all the previous bodges that I've encountered on this poor bike. Today, I started with washing the two crankcase halves in the parts washer. It was while I was drying the timing side half that I noticed that one of the two dowels that secure the main bearing bush and stop it rotating was missing. It was there when I started so it must have come out in the parts washer. A quick grope about on the bottom and I'd found it... or rather, I hadn't. I'd found what had been used but it wasn't a dowel; it was what looked like the bottom end of a nail that the PO had cut off and stuck in. I didn't know whether to laugh or cry!! Needless to say, that was disposed of in an approved manner and a new steel dowel was turned up on the lathe and pressed into place.
When I checked the two ball bearings in the drive side crankcase half, they didn't feel as good as I'd thought earlier. The bearings were removed in the usual way. The spacing washer that is fitted between them also showed a lot of wear on both sides. I'm not messing about this time, two new ball bearings and a new spacer have been ordered from Seven Surby at AMC Classic Spares. I also needed some new tab washers, for the little chaincase fixing screws and the clutch hub nut, so they were added to the order as well.
Saturday, 26th July, 2025.
It was while I was taking the engine out that I noticed that the three little hex head screws that secure the inner chaincase to the crankcase were loose. They were held by the tab washers but needed looking at. Well, I looked at them, and the threads in the crankcase were badly worn. They are an old British thread, "0 B.A.". I didn't have a repair kit for that thread size, but fortunately, Chronos did, and at a reasonable price, so I ordered one. That arrived this morning and the threads in the crankcase now have stainless steel heli-coil type inserts. I'm happier with that!!
Sunday, 27th July, 2025.
Time to fit the new main bearings. If you read the manuals, then conventional wisdom says that you hammer the bearings into the drive side crankcase half and then hammer the crankshaft through the bearings. OK... maybe not quite those words but they definitely say "drive the bearings into the crankcase using a suitable drift". That also poses the problem of lining up the spacing washer between the bearings as there is no positive location for it. If it's not positioned exactly, you won't get the crankshaft axle through the bearings when the time comes. There is also the possibility of damaging the crankcase as the bearing is driven in. I'm of the opinion that a hammer should only be used for banging in nails so I've come up with an alternative method. I used it successfully when I assembled the G3/LS engine.


 The crankshaft was left in the bottom draw of my freezer overnight. This morning, the bearings were warmed in the oven at 120°C for half an hour. With the crankshaft in position on the Workmate, the larger of the two hot ball bearings was dropped onto the drive side axle with a satisfying "ting" as it located against the shoulder on the axle. That was followed by the spacing washer and the smaller of the two bearings. As the bearings cooled down, the crankcase half was heated up to 175°C. That was subsequently lined up over the bearings and it dropped easily into position. That's it... bearings and crankshaft installed. No need for hammers and "suitable drifts" and no damage to any of the parts.
The trouble with the AMC frame is that it's bolted together from a lot of different parts. When you remove the 3/8" diameter stud from the bottom of the engine, the two frame side rails and the front down tube spring apart with a "boing" and you just know that you're going to have a problem getting that stud back through all the component parts when you try to put the engine back. This time, I'm going to try and preempt the problem with the use of three ratchet straps. By adjusting the tensions, I've pulled the three bits into a position where I hope I can get the stud through with the minimum of stress. Well, that's the plan, anyway!!
Friday, 1st August, 2025.
Well, that went better than I expected!! I sealed the two crankcase halves with a thin coat of "ThreeBond" and bolted them together a couple of days ago. I left them so that the sealant could "cure", if that's the right word, before the bolts were removed and the engine bottom end offered up to the frame and engine plates this morning. The troublesome bottom stud turned out to be no trouble at all and went through the frame and engine easily... Result!!. The magneto, dynamo, primary drive and clutch have all be assembled to the engine/gearbox.
Saturday, 2nd August, 2025.
A bit more done today... Oil lines attached with a new felt filter in the tank and a cleaned mesh filter in the feed line. The piston was fitted followed by the cylinder barrel. The crankshaft timing pinion was next, followed by the two camshafts. At this point, I had a choice... I could set the inlet cam to either of the two timing marks. There was one for the 350 and one for the 500. Although the cam profile is the same for both, the 350 inlet cam timing is advanced by one tooth, that's 9° of camshaft rotation as there are 40 teeth on the camshaft pinion, but 18° of crankshaft rotation, compared to the 500. This gives a little more performance and that was the one I chose to use. I spoke to Ken DeGroome a few years ago and asked him why the difference? He said that the 500 inlet cam timing was retarded slightly to make the engine more tractable and the bigger bike more suitable for hauling a sidecar.


After a break for lunch, the magneto contact points were cleaned and gapped. Then the ignition timing was set. That was achieved in the usual way with a dial test indicator on the piston crown to set TDC on the timing disc on the crankshaft. The timing was set to 39° BTDC using the box of electronic wizardry I bought from The Magneto Guys. That makes setting the timing accurately a piece of cake... No need for cigarette papers any more.
I suppose I should point out that these three photos are not from the current job... Top left is actually the M18S but was taken some years ago, before I moved to rural Lincolnshire. The two on the right are actually my G3/LS but they are the only photos I can find that show the DTI, timing disc and static timing light.
Tuesday, 5th August, 2025.
I wondered about the cylinder head. In the end I decided not to dismantle all the valve gear. There wasn't a lot of carbon and in the great scheme of things, she hadn't done many miles since the last rebuild. I did clean up around the spigot for the cylinder barrel. I used four Viton "O" rings on each pushrod tube instead of the solid rubber tube that's supplied in the gasket set. I've found that they give a more reliable seal for longer. The bolts were torqued down to 38 lbs/ft. The new copper gasket was annealed before use.
If you've come to this part of Bess's saga from parts 1 & 2, you may (but probably not) remember that she was a bit noisy mechanically, and at the time, I put that down to a very worn bore and piston. Well... I've found something else that may be a contributing factor... The rocker box, or more specifically the exhaust rocker spindle. There was about 60 thou end float. The end float on the inlet rocker spindle was barely discernable, almost zero. Don't know how I missed that last time... my bad! Anyway, I removed the nut and pushrod rocker arm, took a few measurements and turned up a bronze spacing washer. That was positioned over the spindle, behind the rocker arm, and the whole lot tightened up again. Perfect... everything moved freely with just the slightest amount of float. The rocker box was re-assembled to the head and the pushrods adjusted as per the manual... free to rotate but no up-and-down movement with the piston at TDC on the compression stroke.
Friday, 8th August, 2025.
The last few odds and ends were buttoned up today. Exhaust pipe, footrests, gearbox levers and rear brake rod. Only the battery, tank and seat to put back but they will have to wait until the tank comes back from Kris at the Lutton Body Shop.
Friday, 10th October, 2025.
 I collected the tank from Kris a couple of days ago. As expected, he (or rather his son, Jack), has mad a cracking job of it. There is no trace of the deep scratches and the new paintwork is blended perfectly with the old... and it came in cheaper than his original estimate. This morning I put the tank and seat back on, dumped 5 litres of E05 petrol into the tank and gave her a couple of prods on the kick-starter. She fired up, ran and settled down to a nice even tick-over. It took a few moments for the oil to start returning, but return it did. All ready for a short run out, now.
Later that day...
After a lunchtime fish & chips at Churchill's, we set off around my 35 mile Fenland test circuit. It has a bit of everything. A few B road twisties, a flat out 2 mile blast down Red Cow Drove and a return along the horrendously congested A17. It is the Fens, though, so there were no hills. Bess performed admirably and brought me home without any dramas. The engine remained oil tight but I'll confirm that after she's been standing for a couple of days. All in all, it looks like a job well done.
Wednesday, 5th November, 2025.
Hmmm... Well that didn't go exactly as planned. It was bright, dry and quite mild for the time of year, so I though it would be a good idea to run Bess down to the Strathmore Arms in St. Paul's Walden for what would probably be the last ride out before the bikes were locked up for the Winter. Although Bess had performed admirably a moth ago, it wasn't too many miles into the journey before I started to think that all was not quite right. The engine was "running on" just a little when the throttle was closed. Then there was the occasional spit back through the carburettor when slowing down. By then I'd reached the A1(M) and thought a good blast down that for a few miles would "clear it out"!! Well... I got as far as the approach to the mega road works at what used to be the Black Cat round-a-bout when I had to slow down for traffic. As I slowed, the engine started 8-stroking then stopped altogether. I managed to get her into a bus-stop lay-by so we weren't in any danger from the heavy traffic. Attempting to restart her just resulted in a vicious kick back from the kick-starter and a spit back through the carb. It was obvious that the ignition timing was too far advanced. Something was amiss... and no attempt at starting the engine was going to get her running again. I surmised that either the auto advance unit was jammed at "full advance" or one of the magneto chain sprockets had moved on its shaft. Fortunately, my insurance included breakdown recovery so about 30 minutes after I made a phone call, Bess was loaded into the back of a recovery van. That took us back to the Peterborough Service Area at Junction 17 on the A1(M), where another van arrived to bring us the rest of the way home. Bess is now back in the garage and will be transferred to the workshop in due course for further investigation.


Thursday, 27th November, 2025.
I've had Bess in the workshop for a couple of weeks, now, but sometimes life just gets in the way, and jobs take longer than expected. I've removed the primary drive and the crankshaft shock absorber spring. The timing disc has been refitted and the ignition timing checked. I had surmised that the timing had "slipped" and that indeed proved to be the case. I'd set it at 39° BTDC on full advance when I put the engine back together. Now the points were opening at 60° BTDC with the auto advance unit (AAU) set fully retarded. No wonder it wouldn't start!!! So... what had shifted? The way I see it, realistically, it could only be one (or more) of three things.
1)...The magneto chain drive sprocket could have come loose on the exhaust camshaft.
2)... The AAU could have come loose on the magneto shaft.
3)... The cam that opens the points could have shifted on the end of the magneto armature shaft.
In all honesty, I don't believe that the points opening cam has moved. The retaining screw was tight and I couldn't move the cam on the armature spindle. That said, for my own peace of mind, the magneto has been shipped off to Paul Wolf in Bristol. He has the knowledge and the equipment to check that the cam is correctly timed to open the points just as the magnetic field through the armature 'flips'. He will check it out and let me know if anything is amiss with the the magneto. That leaves the two magneto drive chain sprockets. Both fit onto tapered shaft but are not keyed. The nut securing the drive sprocket was tight and the sprocket was tight on exhaust cam spindle taper. It needed a sharp tap with a hammer to free it. There was no obvious sign that it had moved, so I really can't see that being the cause of the slipped timing. The AAU might just be the problem. It's heavy and has considerable inertia when it's spinning. The screw securing it to the magneto spindle was tight(ish) but not overly so. There was also a shiny area on the magneto spindle that 'may' have been the result of some movement between the spindle and the AAU. The "C" washer was well dished so I'll replace it along with the securing screw. When I get the magneto back from Paul Wolf, I may lap the male and female tapers together lightly with some fine grinding paste before final reassembly.
Tuesday, 13th January, 2026.
Crikey... it's 2026 already. Where the f*ck did that year go?? That's a rhetorical question; you don't need to answer! Well Christmas and New Year are over and despite various doctor's and hospital appointments, I've managed to put Bess back together again. It is, however, pouring with rain, so the initial start-up will have to wait. While I would like to hear her running again, I'm not prepared to get soaked for it. For that pleasure, I will have to wait just a little longer.
Link to Index and Home Page.
Link to AJS M18S - Part 1.
Link to AJS M18S - Part 2.
Link to Matchless G3/LS page.
Link to Triumph Tiger 90 page.
Link to Triumph Bonneville T120R page.
Link to Matchless G80CS page.
Link to Honda VFR750 page.
Link to Norton 650SS page.
Last updated 05/11/2025